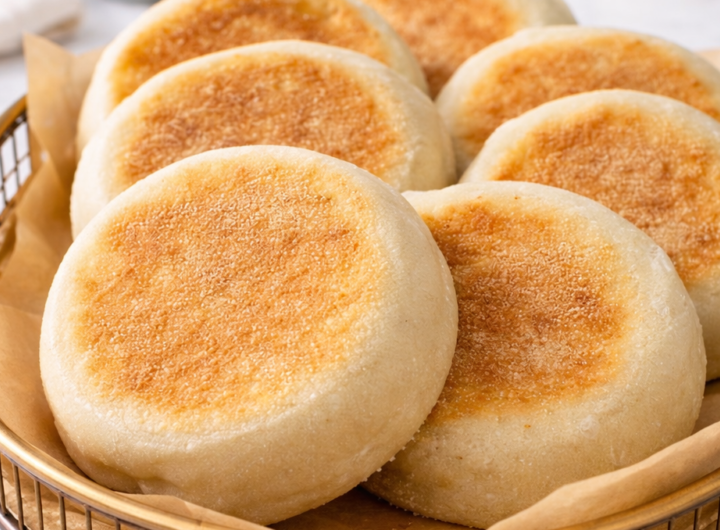
English muffins are one of those foods that feel deceptively simple. They’re small, round, flat, and unassuming—until you split one open and discover the airy interior designed specifically to trap melted butter. Despite their humble appearance, English muffins are a masterclass in dough handling, fermentation, and heat control.
Unlike most breads, English muffins are cooked on a griddle, not baked, and they rely on a combination of yeast activity, hydration, and gentle handling to create their signature texture. When done correctly, you get a lightly crisp exterior, a tender chew, and an interior full of irregular holes that toast beautifully.
This recipe is written for home bakers who want consistent results and real understanding—not shortcuts that sacrifice texture.
What Defines a True English Muffin?
A proper English muffin has several defining characteristics:
- A soft, chewy crumb with large, irregular air pockets
- A flat, round shape, not domed like rolls
- A griddle-cooked exterior, lightly crisp but not hard
- A surface dusted with cornmeal or semolina
- A muffin that is fork-split, not sliced, to preserve the holes
Unlike sandwich bread or rolls, English muffins are made with a high-hydration, sticky dough. That softness is what allows the interior to expand dramatically during cooking.
Ingredients (Makes 10–12 English Muffins)
Dough
- 360 g whole milk, lukewarm (about 95–100°F / 35–38°C)
- 7 g active dry yeast (or 5 g instant yeast)
- 15 g sugar
- 30 g butter, melted and cooled
- 1 large egg (optional, but adds tenderness)
- 9 g salt
- 540 g all-purpose flour
For Dusting
- Cornmeal or semolina flour (essential)
Equipment You’ll Need
- Mixing bowl
- Measuring scale or cups
- Bench scraper
- Baking sheet
- Parchment paper
- Cast iron skillet or heavy griddle
- Spatula
- Fork (for splitting)
Step 1: Activate the Yeast
In a large bowl, combine:
- Warm milk
- Sugar
- Yeast
Stir gently and let sit for 5–10 minutes, until the mixture looks foamy and smells yeasty.
This step ensures your yeast is alive and active. If nothing happens after 10 minutes, stop and replace your yeast.
Step 2: Mix the Dough
To the yeast mixture, add:
- Melted butter
- Egg (if using)
- Salt
Stir to combine.
Add the flour gradually, mixing with a spoon or your hands. The dough will be soft and sticky—this is correct. Do not add extra flour unless the dough is completely unmanageable.
Once all the flour is incorporated, the dough should:
- Pull away from the sides slightly
- Stick to your fingers
- Feel elastic but loose
Step 3: Knead Gently
Turn the dough out onto a lightly floured surface.
Knead for 8–10 minutes, using a gentle push-and-fold motion. Avoid aggressively punching the dough—English muffins benefit from delicate handling.
You’re aiming for:
- Smooth surface
- Elastic structure
- Dough that still feels soft and slightly tacky
If the dough sticks excessively, dust lightly with flour, but sparingly.
Step 4: First Rise (Bulk Fermentation)
Shape the dough into a ball and place it in a lightly greased bowl. Cover with a towel or plastic wrap.
Let rise at room temperature for 1½ to 2 hours, or until doubled in size.
During this rise:
- Yeast produces gas
- Gluten relaxes
- Flavor begins to develop
Do not rush this step. Under-fermented dough will produce dense muffins.
Step 5: Divide and Shape
Turn the risen dough onto a lightly floured surface.
Gently press it into a rectangle about ¾ inch (2 cm) thick.
Using a round cutter (3–3½ inches) or a glass:
- Cut straight down without twisting
- Transfer each round to a baking sheet lined with parchment
- Sprinkle the parchment generously with cornmeal or semolina
Re-roll scraps gently once, then discard any remaining dough to avoid toughness.
Step 6: Second Rise (Proofing)
Dust the tops of the muffins lightly with cornmeal.
Cover loosely and let rise for 30–45 minutes, until slightly puffy but not doubled.
When ready:
- Muffins should feel airy
- Pressing lightly leaves a slow-springing indentation
Overproofed muffins may collapse during cooking.
Step 7: Cook on the Griddle
Heat a cast iron skillet or griddle over low to medium-low heat. Temperature control is critical.
Lightly grease the surface.
Place muffins onto the griddle, leaving space between them.
Cook for:
- 6–8 minutes per side
Flip only once. The muffins should:
- Develop a golden crust
- Rise slightly taller
- Sound hollow when tapped
If browning too quickly, lower the heat. The goal is to cook the interior fully without burning the exterior.
Step 8: Finish Cooking (Optional but Recommended)
To ensure the centers are fully cooked:
Option 1:
Transfer muffins to a 350°F / 175°C oven for 5–8 minutes.
Option 2:
Cover the skillet with a lid during the last few minutes of cooking to trap heat.
Internal temperature should reach 200°F / 93°C.
Step 9: Cool Completely
Transfer muffins to a wire rack.
Allow to cool for at least 30 minutes before splitting. Cutting too early can compress the crumb.
How to Split English Muffins Properly
Never use a knife.
Instead:
- Insert the tines of a fork around the circumference
- Gently pry apart
This preserves the natural air pockets that toast so beautifully.
Texture, Flavor, and Storage
Texture
- Crisp outer surface
- Chewy interior
- Large, irregular holes
Flavor
- Mildly sweet
- Rich from butter and milk
- Slightly tangy from fermentation
Storage
- Room temperature: 2 days
- Refrigerator: up to 5 days
- Freezer: up to 2 months (split before freezing)
Variations
Whole Wheat English Muffins
Replace up to 50% of the flour with whole wheat flour. Add 1–2 tablespoons extra milk.
Sourdough English Muffins
Replace yeast with 150 g active sourdough starter and reduce flour and milk accordingly.
No-Egg Version
Simply omit the egg. The muffins will be slightly chewier but still excellent.
Extra-Crispy Muffins
Brush lightly with butter before cooking and toast longer before serving.
Troubleshooting
Dense muffins
→ Dough too dry or under-proofed
Burnt outside, raw inside
→ Heat too high
Flat muffins
→ Overproofed dough or weak yeast
Few holes
→ Over-kneading or slicing instead of fork-splitting
Final Thoughts
English muffins reward patience and restraint. The temptation is always to add flour, turn up the heat, or rush the rise—but resisting those urges is what gives you that perfect balance of crisp exterior and airy interior.
Once you’ve made them a few times, you’ll stop buying store-bought muffins entirely. Homemade English muffins aren’t just better—they’re a completely different food.